
Intro
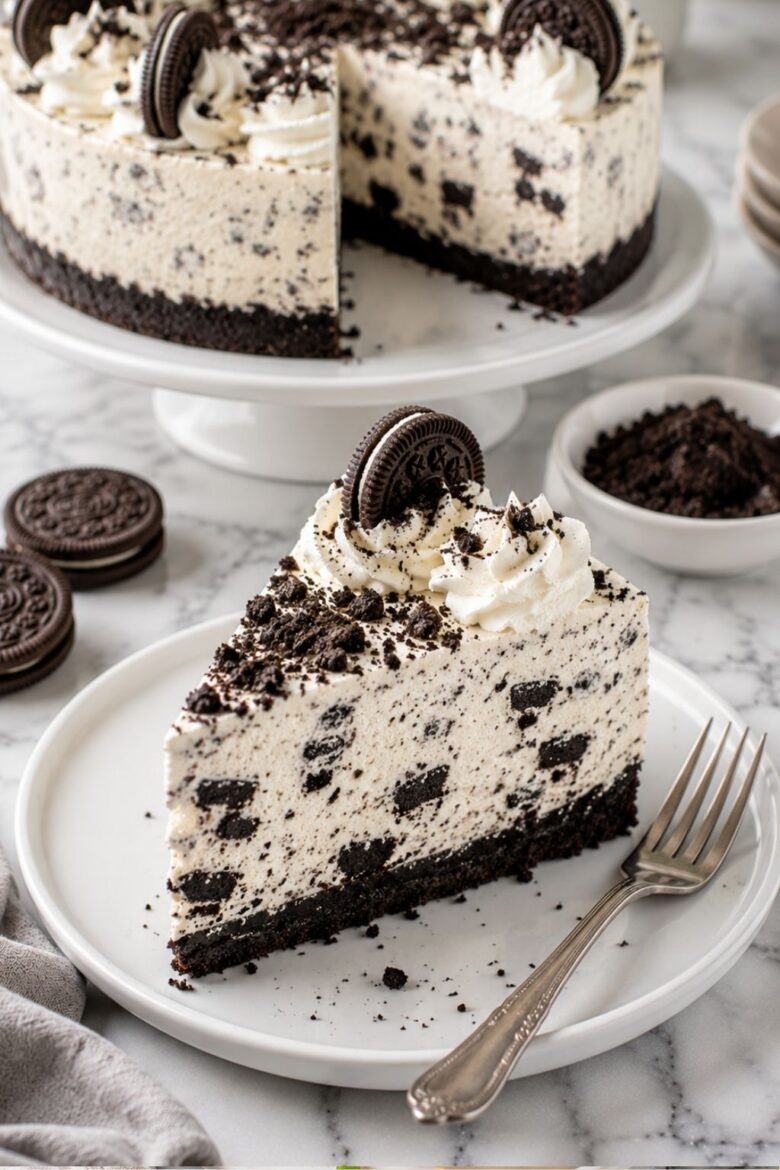
There are some desserts that look like they took hours to make but are actually surprisingly easy, and this No-Bake Oreo Cheesecake is one of my absolute favorites. As a female chef who loves creating impressive desserts without making life unnecessarily complicated, I always appreciate a recipe that delivers big flavor with simple ingredients.
This cheesecake has everything I love in a homemade dessert: a crunchy chocolate Oreo crust, a smooth and creamy cheesecake filling, plenty of crushed Oreo cookies, and that rich cookies-and-cream flavor that makes it hard to stop at just one slice. The best part? You do not even need to turn on the oven.
I especially love making this dessert during warmer months when the idea of baking feels like too much work. But honestly, it is just as perfect for birthdays, holidays, family dinners, potlucks, or those days when you simply want a homemade treat waiting in the refrigerator.
The filling is light, creamy, and slightly tangy from the cream cheese, while the crushed Oreos add little bits of chocolatey crunch throughout. When paired with the buttery cookie crust, every bite tastes rich, smooth, and wonderfully indulgent.
If you are looking for an easy dessert that feels special without requiring advanced baking skills, you are going to love this one. Let me show you exactly how to make it.
What Is No-Bake Oreo Cheesecake?
No-Bake Oreo Cheesecake is a chilled dessert made with an Oreo cookie crust and a creamy cheesecake filling that sets in the refrigerator instead of baking in the oven.
Traditional cheesecake is usually baked and often requires careful temperature control. It can be delicious, of course, but it also takes more time and attention. A no-bake version is much simpler because the filling is prepared by mixing cream cheese with sugar and other ingredients, then folding in whipped cream to create a light but rich texture.
For this recipe, crushed Oreo cookies are used in two ways. First, they create the chocolatey cookie crust. Then additional crushed cookies are folded into the cheesecake filling, giving every slice that classic cookies-and-cream look.
The finished cheesecake is chilled until firm, then sliced and served cold.
The flavor is creamy, chocolatey, sweet, and slightly tangy. The contrast between the smooth filling and crunchy cookie pieces is what makes this dessert so enjoyable.
Why You’ll Love This Recipe
There are plenty of reasons to keep this dessert recipe in your collection.
No Oven Required
The biggest advantage is right in the name. You do not need to bake the cheesecake, which makes the entire process easier and keeps your kitchen cooler.
Easy Ingredients
Most of the ingredients are simple and easy to find. Oreos, cream cheese, butter, sugar, vanilla, and heavy cream come together to create something that tastes far more impressive than the ingredient list might suggest.
Perfect for Make-Ahead Desserts
This cheesecake needs time to chill anyway, so it is an excellent dessert to prepare in advance.
Make it the night before a party or family dinner, and you will have one less thing to worry about the next day.
A Crowd-Pleasing Flavor
Cookies and cream is one of those flavors that work for almost everyone. Kids love it, adults love it, and it fits beautifully into birthdays, holidays, and casual celebrations.
What Does No-Bake Oreo Cheesecake Taste Like?
The flavor is rich, creamy, chocolatey, and slightly tangy.
The Oreo crust has a deep cocoa flavor with a buttery finish. It adds a firmer texture that contrasts beautifully with the soft cheesecake filling.
The filling is smooth and creamy from the cream cheese, but it is not supposed to feel heavy. Whipped cream makes it lighter and gives it that fluffy, mousse-like texture.
Then come the Oreo pieces.
Some are finely crushed and almost disappear into the filling, while larger pieces create little bursts of chocolate cookie crunch. The cream filling inside the Oreos adds sweetness and helps create that familiar cookies-and-cream flavor.
When everything is chilled properly, each slice holds its shape while still feeling soft and creamy when you take a bite.
Equipment List
You do not need special baking equipment to make this recipe. A few basic kitchen tools are enough.
- 9-inch springform pan
- Food processor or rolling pin
- Large mixing bowls
- Electric hand mixer or stand mixer
- Rubber spatula
- Measuring cups and spoons
- Mixing spoon
- Offset spatula or regular spatula
- Knife for slicing
A springform pan is especially helpful because it allows you to remove the cheesecake without turning it upside down or damaging the filling.
If you do not have a food processor, place the Oreos in a sealed bag and crush them with a rolling pin.
Ingredients (With Quantities)
For the Oreo Crust
- 24 Oreo cookies
- 5 tablespoons unsalted butter, melted
For the Cheesecake Filling
- 16 ounces full-fat cream cheese, softened
- ¾ cup powdered sugar
- 1 teaspoon vanilla extract
- 1½ cups heavy whipping cream, cold
- 12 Oreo cookies, roughly crushed
Optional Toppings
- 6 to 8 Oreo cookies
- Whipped cream
- Chocolate shavings
- Chocolate sauce
For the best flavor and texture, use full-fat block-style cream cheese. It creates a thicker and creamier filling than spreadable cream cheese.
Instructions
1. Prepare the Oreo Crust
Place 24 Oreo cookies in a food processor and pulse until they become fine crumbs.
There is no need to remove the cream filling from the cookies. Use the entire Oreo.
Pour the crumbs into a bowl and add the melted butter.
Stir until all of the crumbs are evenly coated.
Transfer the mixture to a 9-inch springform pan. Press the crumbs firmly into the bottom of the pan using the bottom of a measuring cup or glass.
Make sure the crust is packed tightly because this helps it hold together when sliced.
Place the pan in the refrigerator while you prepare the filling.
2. Beat the Cream Cheese
Add the softened cream cheese to a large mixing bowl.
Beat it with an electric mixer until it becomes smooth and creamy.
This step is important. Cold cream cheese can leave small lumps in the filling, so allow it to soften at room temperature before mixing.
Add the powdered sugar and vanilla extract.
Beat again until everything is fully combined and smooth.
Scrape down the sides of the bowl as needed.
3. Whip the Heavy Cream
In a separate cold mixing bowl, add the cold heavy whipping cream.
Beat until stiff peaks form.
You will know the cream is ready when it holds its shape when the beaters are lifted.
Be careful not to overmix because whipped cream can eventually become grainy.
4. Fold the Filling Together
Add the whipped cream to the cream cheese mixture.
Use a rubber spatula to gently fold everything together.
Avoid stirring too aggressively because you want to keep as much air as possible in the whipped cream.
The filling should become smooth, light, and fluffy.
This gentle folding step is one of the secrets to creating a creamy cheesecake that does not feel overly dense.
5. Add the Crushed Oreos
Roughly crush 12 Oreo cookies.
You can leave some larger pieces because they add texture and make the finished slices look beautiful.
Gently fold the crushed cookies into the cheesecake filling.
At this point, the filling should have that classic cookies-and-cream appearance, with dark cookie pieces scattered throughout the pale, creamy mixture.
6. Assemble the Cheesecake
Remove the prepared crust from the refrigerator.
Spoon the cheesecake filling over the Oreo crust.
Use a spatula to spread the filling evenly.
Smooth the top as much as you like. It does not need to be perfectly flat because you can decorate it later.
For me, this is one of those moments where I remind myself that homemade desserts do not have to look like they came from a factory. A little natural texture can make a dessert feel even more inviting.
7. Chill Until Firm
Cover the cheesecake and place it in the refrigerator.
Chill for at least 6 hours, but overnight is even better.
The filling needs enough time to firm up so the cheesecake can be sliced cleanly.
If you try to serve it too early, the filling may be too soft.
Patience is probably the hardest part of this recipe because it looks delicious long before it is ready!
Tips for the Best No-Bake Oreo Cheesecake
Use Softened Cream Cheese
Cold cream cheese does not blend smoothly.
Allow it to sit at room temperature for about 30 to 45 minutes before making the filling.
It should be soft enough to mix easily but not melted or warm.
Use Cold Heavy Cream
Heavy cream whips best when it is cold.
For even better results, you can place your mixing bowl and beaters in the refrigerator for a few minutes before whipping the cream.
Pack the Crust Firmly
A loose crust can crumble when you slice the cheesecake.
Press the Oreo crumbs firmly into the pan.
A flat-bottomed glass or measuring cup works perfectly for this.
Do Not Rush the Chilling Time
The cheesecake needs time to set.
Six hours is the minimum I recommend, but overnight chilling gives you the best texture.
Fold Gently
Whipped cream gives the filling its light texture.
Use gentle folding motions instead of vigorous stirring.
Why Full-Fat Cream Cheese Makes a Difference
Cream cheese is the heart of the filling, so choosing the right type matters.
Full-fat block-style cream cheese gives the cheesecake a rich, smooth texture and helps it set properly.
Lower-fat cream cheese contains more moisture and can create a softer filling.
For a dessert like this, I believe this is the time to enjoy the full-fat version. You are making cheesecake, after all!
The result is richer, creamier, and much more satisfying.
How to Make the Perfect Oreo Crust
The crust may seem simple, but a few small details make a big difference.
First, crush the cookies evenly. Fine crumbs create a more stable crust.
Second, make sure every crumb is coated with melted butter.
Too little butter can create a crumbly crust, while too much can make it greasy.
Finally, press the crust firmly into the pan.
I like using the bottom of a measuring cup because it creates an even surface without much effort.
Chilling the crust before adding the filling also helps everything stay in place.
Fun Variations to Try
One of the best things about No-Bake Oreo Cheesecake is how easy it is to customize.
Mint Oreo Version
Use mint-flavored Oreo cookies for a cool chocolate-mint twist.
You can also add a tiny amount of peppermint extract to the filling.
Peanut Butter Oreo Version
Add a few tablespoons of creamy peanut butter to the cream cheese mixture.
The combination of chocolate cookies and peanut butter is always a winner.
Chocolate Lovers Version
Add melted and cooled chocolate to the filling for an extra-rich chocolate cheesecake.
Top it with chocolate shavings and crushed Oreos.
Mini Cheesecakes
Instead of using a large springform pan, make individual cheesecakes in muffin cups.
They are perfect for parties and easy to serve.
Extra Oreo Topping
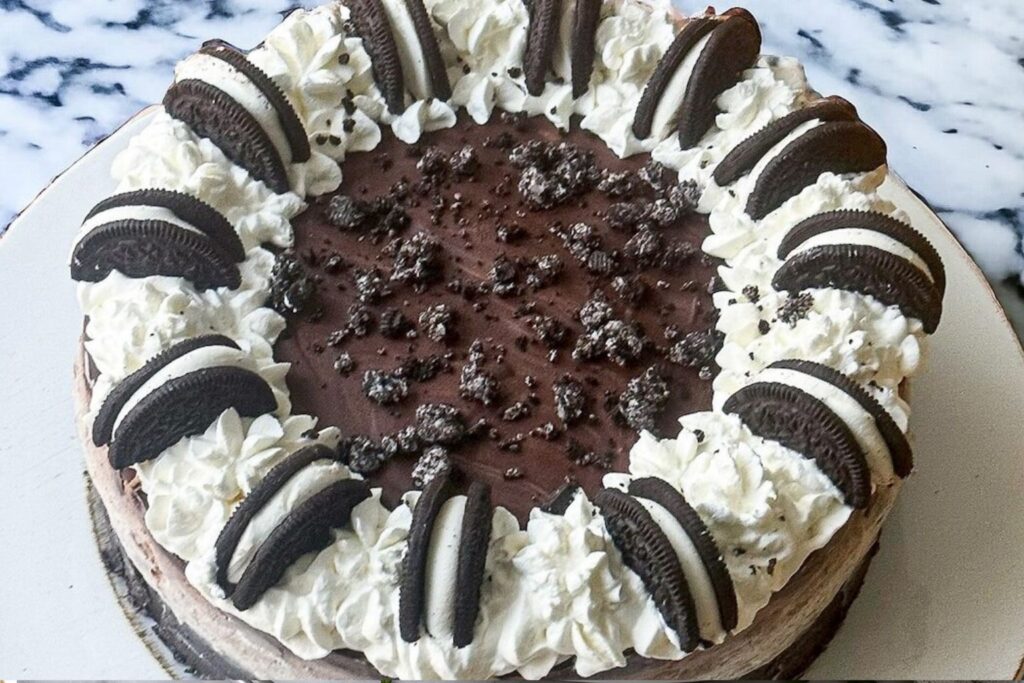
For an even more dramatic presentation, cover the top with crushed Oreos and whole cookie halves.
Can I Make This Cheesecake Ahead of Time?
Absolutely.
In fact, this dessert is better when made ahead because it needs plenty of chilling time.
You can prepare the cheesecake one day before serving and keep it covered in the refrigerator.
Wait until closer to serving time to add whipped cream decorations or extra cookie toppings if you want them to look especially fresh.
How to Store Leftovers
Store leftover cheesecake covered in the refrigerator.
It is best enjoyed within 4 to 5 days.
Keep the cheesecake cold because the filling contains cream cheese and whipped cream.
If the cheesecake sits at room temperature for too long, the texture will become soft.
Can You Freeze No-Bake Oreo Cheesecake?
Yes, this cheesecake can be frozen.
Place the cheesecake in the freezer until firm.
Then wrap it tightly in plastic wrap and foil.
Freeze for up to 1 month for the best flavor and texture.
When you are ready to serve it, move it to the refrigerator and allow it to thaw slowly.
Avoid thawing it at room temperature because that can affect the texture.
What to Serve With Oreo Cheesecake
This dessert is rich enough to enjoy on its own, but a few additions can make it even more fun.
Fresh Berries
Strawberries and raspberries add a bright, slightly tangy flavor that cuts through the richness.
Extra Whipped Cream
A swirl of whipped cream makes each slice look beautiful.
Chocolate Sauce
Drizzle a little chocolate sauce over each serving for extra chocolate flavor.
Coffee
A cup of coffee pairs beautifully with the creamy sweetness of the cheesecake.
The slightly bitter coffee balances the rich dessert surprisingly well.
Common Mistakes to Avoid
Using Cold Cream Cheese
This can lead to a lumpy filling.
Always soften the cream cheese before mixing.
Not Whipping the Cream Enough
Softly whipped cream will not provide enough structure for the cheesecake.
Whip until stiff peaks form.
Overmixing the Whipped Cream
Overmixing can make the cream grainy.
Stop as soon as stiff peaks form.
Not Chilling Long Enough
The cheesecake needs time to firm up.
If you want neat slices, do not rush this step.
Making the Crust Too Loose
Press the crumbs firmly into the pan.
A loose crust may fall apart when sliced.
Frequently Asked Questions
Do I Need to Remove the Cream From the Oreos?
No. Use the entire cookie, including the cream filling.
It adds sweetness and helps create the classic Oreo flavor.
Can I Use Whipped Topping Instead of Heavy Cream?
Yes.
You can substitute whipped topping for freshly whipped cream if you want an even quicker recipe.
However, freshly whipped heavy cream gives the filling a richer and more natural flavor.
Why Is My Cheesecake Too Soft?
The most common reasons are not chilling it long enough or using ingredients with too much moisture.
Make sure to use full-fat cream cheese and whip the heavy cream until stiff peaks form.
Can I Make It in a Different Pan?
Yes.
A square baking dish can work, although the cheesecake will be sliced differently.
Individual cups are also a great option for parties.
How Long Should I Chill It?
At least 6 hours, but overnight is ideal.
The longer chilling time helps the cheesecake become firm and easy to slice.
Serving Ideas for Special Occasions
This cheesecake works for almost any celebration.
For birthdays, decorate the top with whipped cream swirls and Oreo pieces.
For holidays, add chocolate decorations or seasonal sprinkles.
For a casual family dinner, simply serve clean slices with a few crushed cookies on top.
I personally love desserts that can be dressed up or kept simple depending on the occasion. You can make this cheesecake look elegant for a party or relaxed and homemade for a quiet evening at home.
Either way, the flavor is what people will remember.
My Final Tips for a Perfect Cheesecake
If I could give you only three pieces of advice, they would be these.
First, use good-quality full-fat cream cheese.
Second, whip your heavy cream properly and fold it gently into the filling.
Third, give the cheesecake enough time to chill.
Those three details make a huge difference in the final texture.
The beauty of this recipe is that it does not require complicated baking skills. There is no water bath, no worrying about cracks, and no waiting for a baked cheesecake to cool slowly in the oven.
You simply mix, assemble, chill, and enjoy.
Final Thoughts
This creamy dessert proves that you do not need complicated techniques to make something memorable. The combination of a crunchy Oreo crust, smooth cheesecake filling, fluffy whipped cream, and chocolate cookie pieces creates a dessert that feels both familiar and special.
I love making No-Bake Oreo Cheesecake when I want to bring a dessert to the table that makes people smile before they even take the first bite. It looks beautiful, tastes rich and indulgent, and can be prepared ahead of time.
Whether you are making it for a birthday, a holiday, a family dinner, or simply because you are craving something creamy and chocolatey, this recipe is always a good idea.
So grab those Oreos, soften the cream cheese, and make room in your refrigerator. Once the cheesecake has chilled and you slice into that creamy cookies-and-cream filling, you will see why this dessert is such a favorite.
Serve it cold, add an extra Oreo on top if you are feeling generous, and enjoy every creamy, chocolatey bite.
More Delicious Recipes
- Chicken Broccoli Pasta: A Creamy, Cozy Dinner Everyone Will Love https://foodnesty.com/chicken-broccoli-pasta-recipe/
- Sausage Breakfast Casserole: An Easy, Cheesy Breakfast Everyone Will Love https://foodnesty.com/sausage-breakfast-casserole-recipe/
- Lemon Pepper Chicken Recipe https://foodnesty.com/lemon-pepper-chicken-recipe/
No-Bake Oreo Cheesecake Recipe
Equipment
- 9-inch springform pan
- Food processor or rolling pin
- Large mixing bowls
- Electric hand mixer or stand mixer
- Rubber spatula
- Measuring cups and spoons
- Mixing spoon
- Offset spatula or regular spatula
- Knife for slicing
Ingredients
For the Oreo Crust
- 24 Oreo cookies
- 5 tablespoons unsalted butter melted
- For the Cheesecake Filling
- 16 ounces full-fat cream cheese softened
- ¾ cup powdered sugar
- 1 teaspoon vanilla extract
- 1½ cups heavy whipping cream cold
- 12 Oreo cookies roughly crushed
Optional Toppings
- 6 to 8 Oreo cookies
- Whipped cream
- Chocolate shavings
- Chocolate sauce
For the best flavor and texture, use full-fat block-style cream cheese. It creates a thicker and creamier filling than spreadable cream cheese.
Instructions
Prepare the Oreo Crust
- Place 24 Oreo cookies in a food processor and pulse until they become fine crumbs.
- There is no need to remove the cream filling from the cookies. Use the entire Oreo.
- Pour the crumbs into a bowl and add the melted butter.
- Stir until all of the crumbs are evenly coated.
- Transfer the mixture to a 9-inch springform pan. Press the crumbs firmly into the bottom of the pan using the bottom of a measuring cup or glass.
- Make sure the crust is packed tightly because this helps it hold together when sliced.
- Place the pan in the refrigerator while you prepare the filling.
Beat the Cream Cheese
- Add the softened cream cheese to a large mixing bowl.
- Beat it with an electric mixer until it becomes smooth and creamy.
- This step is important. Cold cream cheese can leave small lumps in the filling, so allow it to soften at room temperature before mixing.
- Add the powdered sugar and vanilla extract.
- Beat again until everything is fully combined and smooth.
- Scrape down the sides of the bowl as needed.
Whip the Heavy Cream
- In a separate cold mixing bowl, add the cold heavy whipping cream.
- Beat until stiff peaks form.
- You will know the cream is ready when it holds its shape when the beaters are lifted.
- Be careful not to overmix because whipped cream can eventually become grainy.
Fold the Filling Together
- Add the whipped cream to the cream cheese mixture.
- Use a rubber spatula to gently fold everything together.
- Avoid stirring too aggressively because you want to keep as much air as possible in the whipped cream.
- The filling should become smooth, light, and fluffy.
- This gentle folding step is one of the secrets to creating a creamy cheesecake that does not feel overly dense.
Add the Crushed Oreos
- Roughly crush 12 Oreo cookies.
- You can leave some larger pieces because they add texture and make the finished slices look beautiful.
- Gently fold the crushed cookies into the cheesecake filling.
- At this point, the filling should have that classic cookies-and-cream appearance, with dark cookie pieces scattered throughout the pale, creamy mixture.
Assemble the Cheesecake
- Remove the prepared crust from the refrigerator.
- Spoon the cheesecake filling over the Oreo crust.
- Use a spatula to spread the filling evenly.
- Smooth the top as much as you like. It does not need to be perfectly flat because you can decorate it later.
- For me, this is one of those moments where I remind myself that homemade desserts do not have to look like they came from a factory. A little natural texture can make a dessert feel even more inviting.
Chill Until Firm
- Cover the cheesecake and place it in the refrigerator.
- Chill for at least 6 hours, but overnight is even better.
- The filling needs enough time to firm up so the cheesecake can be sliced cleanly.
- If you try to serve it too early, the filling may be too soft.
- Patience is probably the hardest part of this recipe because it looks delicious long before it is ready!

Sarah Miller is a home cook and recipe developer at Foodnesty. She loves creating simple, comforting, and family-friendly recipes using easy ingredients. Her goal is to help everyone cook delicious food with confidence.