
Intro
There’s something magical about baking on a quiet afternoon, especially when the kitchen fills with that rich cocoa aroma and buttery sweetness. As a female chef who has spent years experimenting in my home kitchen, I can honestly say that this Red Velvet Cookies Recipe holds a special place in my heart. It’s not just about cookies—it’s about comfort, color, and that little moment of joy when you take the first bite.
I still remember the first time I tried turning classic red velvet cake into cookies. I wasn’t sure how it would turn out, but the result? Soft, slightly chewy cookies with a delicate cocoa flavor and that signature red velvet tang. Since then, this recipe has become one of my go-to treats for family gatherings, tea time, and even those “I just need something sweet” days.
If you love desserts that are simple yet feel a little fancy, you’re going to fall in love with this.
What is the Red Velvet Cookies Recipe?
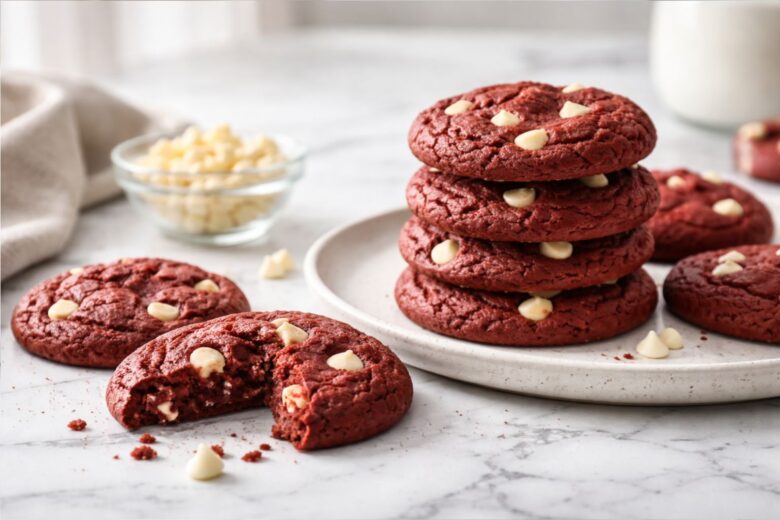
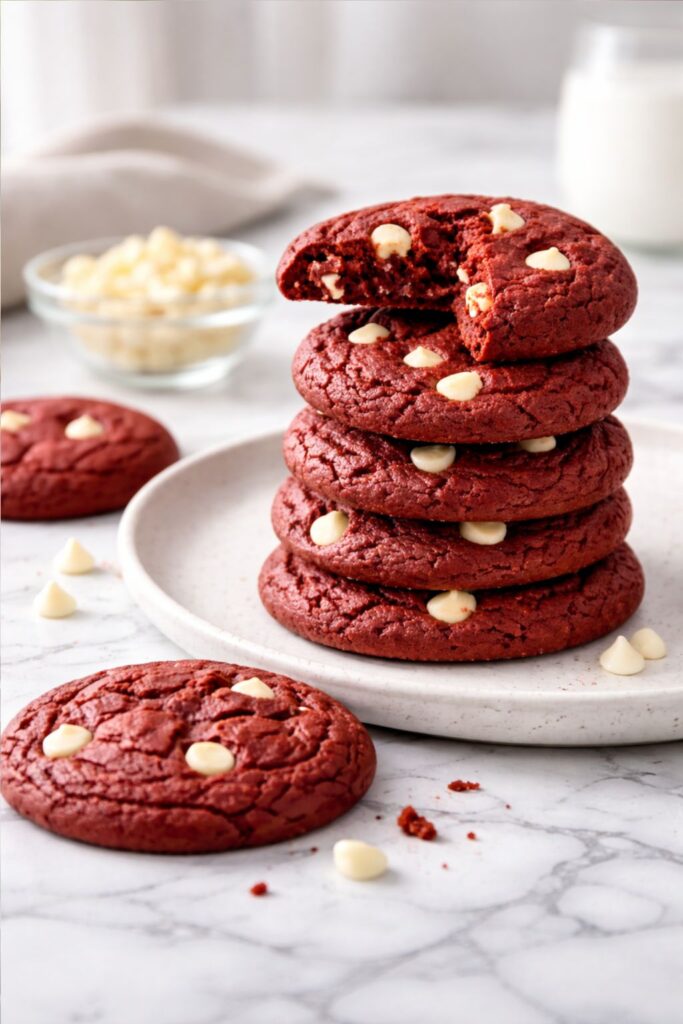
Red velvet cookies are inspired by the classic red velvet cake, known for its mild chocolate flavor, vibrant red color, and slight tang from buttermilk or vinegar. But instead of a fluffy cake, we turn those same flavors into soft, bakery-style cookies.
These cookies have:
- A light cocoa taste (not too chocolatey)
- A soft, tender center with slightly crisp edges
- A beautiful, deep red color
- Often a hint of vanilla and sometimes a cream cheese flavor
What I personally love about this Red Velvet Cookies Recipe is how balanced it is. It’s not overly sweet, and the texture is just perfect—soft enough to melt in your mouth, but firm enough to hold its shape.
Equipment List
Before we start, let’s gather everything. I always say baking becomes stress-free when your tools are ready.
- Mixing bowls (1 large, 1 medium)
- Hand mixer or stand mixer
- Measuring cups and spoons
- Baking tray
- Parchment paper
- Cookie scoop or tablespoon
- Whisk
- Rubber spatula
- Cooling rack
Simple tools, nothing fancy—just how I like it.
Ingredients (with quantities)
Here’s everything you’ll need. I’ll also share a few tips because ingredients really make the difference.
Dry Ingredients:
- 2 cups all-purpose flour
- 1 tablespoon cocoa powder (unsweetened)
- 1 teaspoon baking soda
- ¼ teaspoon salt
Wet Ingredients:
- ¾ cup unsalted butter (softened)
- 1 cup granulated sugar
- ½ cup brown sugar
- 2 large eggs
- 1 tablespoon milk
- 1 teaspoon white vinegar
- 2 teaspoons vanilla extract
- 1 tablespoon red food coloring
Optional Add-ins (Highly Recommended):
- 1 cup white chocolate chips
- ½ cup cream cheese chunks (for filling)
Instructions
Step 1: Prep your oven
Preheat your oven to 180°C (350°F). Line your baking tray with parchment paper.
This step is small, but trust me, starting with a preheated oven keeps everything running smoothly.
Step 2: Mix dry ingredients
In a medium bowl, whisk together:
- Flour
- Cocoa powder
- Baking soda
- Salt
Set aside.
Step 3: Cream butter and sugars
In a large bowl, beat the softened butter, granulated sugar, and brown sugar until light and fluffy. This usually takes about 2–3 minutes.
This step is key for soft cookies. Don’t rush it.
Step 4: Add wet ingredients
Now add:
- Eggs (one at a time)
- Vanilla extract
- Milk
- Vinegar
- Red food coloring
Mix until smooth and well combined. You’ll see that beautiful red color come alive—it’s always my favorite moment!
Step 5: Combine wet and dry
Slowly add the dry ingredients into the wet mixture. Mix gently until just combined.
Do not overmix—this keeps the cookies soft and tender.
Step 6: Add chocolate chips
Fold in white chocolate chips (and cream cheese chunks if using).
This is where the cookies become extra special. That creamy sweetness pairs perfectly with the cocoa flavor.
Step 7: Scoop and shape
Scoop dough using a tablespoon or cookie scoop and place on the baking tray, leaving space between each cookie.
Step 8: Bake
Bake for 10–12 minutes. The edges should be set, but the centers will still look soft.
That’s exactly what you want!
Step 9: Cool down
Let cookies cool on the tray for 5 minutes, then transfer to a cooling rack.
The texture improves as they cool—soft, chewy, and just perfect.
My Personal Tips for Perfect Cookies
After making this Red Velvet Cookies Recipe so many times, here are a few things I’ve learned:
Don’t skip the vinegar
Vinegar enhances the red velvet flavor and balances the sweetness.
Use good cocoa powder
Even though it’s a small amount, it adds depth. A good quality cocoa makes a difference.
Chill the dough (optional but helpful)
If your kitchen is warm, chill the dough for 30 minutes. It helps cookies keep their shape.
Flavor & Texture – What to Expect
These cookies are not like regular chocolate cookies. They’re more delicate in flavor.
- Slight cocoa taste
- Sweet but balanced
- Soft and slightly chewy
- A hint of tanginess
And when you bite into melted white chocolate… It’s pure comfort.
Variations You Can Try
I love experimenting, and you can too!
Cream Cheese Stuffed Cookies
Add a small cube of cream cheese inside each cookie before baking. It melts into a creamy surprise.
Red Velvet Crinkle Cookies
Roll the dough in powdered sugar before baking for a crackled look.
Sandwich Cookies
Spread cream cheese frosting between two cookies—perfect for special occasions.
Serving Ideas
These cookies are perfect for:
- Tea time with friends
- Birthday parties
- Festive occasions
- Gift boxes
I often serve them slightly warm with a cup of chai. Simple and comforting.
Storage Tips
- Store in an airtight container at room temperature for up to 4 days
- Refrigerate for up to 1 week
- Freeze dough for up to 2 months
Whenever I make a batch, I always freeze some dough—it’s like having instant happiness ready anytime.
Common Mistakes to Avoid
Let me save you from a few kitchen disasters:
- Overbaking → cookies become dry
- Too much flour → dense texture
- Skipping butter softening → uneven mixing
Baking is all about balance.
Why You’ll Love This Recipe
This Red Velvet Cookies Recipe is:
- Easy to make
- Beautiful to look at
- Perfectly soft and chewy
- Full of flavor without being heavy
It’s one of those recipes that feels special but doesn’t require complicated steps.
Final Thoughts
Baking these cookies always feels like a small celebration in my kitchen. The color, the aroma, the softness—it all comes together in such a comforting way.
If you’re someone who loves homemade treats that are simple yet impressive, this recipe is definitely for you. And once you try it, I promise—it won’t be the last time you make it.
So go ahead, tie your apron, preheat that oven, and enjoy every step of the process. Because the best part isn’t just eating the cookies—it’s the love you put into making them
More Delicious Recipes:
Red Velvet Cheese Cake Brownies Recipe

Red Velvet Cookies Recipe
Equipment
- Mixing bowls (1 large, 1 medium)
- Hand mixer or stand mixer
- Measuring cups and spoons
- Baking tray
- Parchment paper
- Cookie scoop or tablespoon
- Whisk
- Rubber spatula
- Cooling rack
Ingredients
Dry Ingredients:
- 2 cups all-purpose flour
- 1 tablespoon cocoa powder unsweetened
- 1 teaspoon baking soda
- ¼ teaspoon salt
Wet Ingredients:
- ¾ cup unsalted butter softened
- 1 cup granulated sugar
- ½ cup brown sugar
- 2 large eggs
- 1 tablespoon milk
- 1 teaspoon white vinegar
- 2 teaspoons vanilla extract
- 1 tablespoon red food coloring
Optional Add-ins (Highly Recommended):
- 1 cup white chocolate chips
- ½ cup cream cheese chunks for filling
Instructions
Step 1: Prep your oven
- Preheat your oven to 180°C (350°F). Line your baking tray with parchment paper.
- This step is small, but trust me, starting with a ready oven keeps everything smooth.
Step 2: Mix dry ingredients
- In a medium bowl, whisk together:
- Flour
- Cocoa powder
- Baking soda
- Salt
- Set aside.
Step 3: Cream butter and sugars
- In a large bowl, beat the softened butter, granulated sugar, and brown sugar until light and fluffy. This usually takes about 2–3 minutes.
- This step is key for soft cookies. Don’t rush it.
Step 4: Add wet ingredients
- Now add:
- Eggs (one at a time)
- Vanilla extract
- Milk
- Vinegar
- Red food coloring
- Mix until smooth and well combined. You’ll see that beautiful red color come alive—it’s always my favorite moment!
Step 5: Combine wet and dry
- Slowly add the dry ingredients into the wet mixture. Mix gently until just combined.
- Do not overmix—this keeps the cookies soft and tender.
Step 6: Add chocolate chips
- Fold in white chocolate chips (and cream cheese chunks if using).
- This is where the cookies become extra special. That creamy sweetness pairs perfectly with the cocoa flavor.
Step 7: Scoop and shape
- Scoop dough using a tablespoon or cookie scoop and place on the baking tray, leaving space between each cookie.
Step 8: Bake
- Bake for 10–12 minutes. The edges should be set, but the centers will still look soft.
- That’s exactly what you want!
Step 9: Cool down
- Let cookies cool on the tray for 5 minutes, then transfer to a cooling rack.
- The texture improves as they cool—soft, chewy, and just perfect

Sarah Miller is a home cook and recipe developer at Foodnesty. She loves creating simple, comforting, and family-friendly recipes using easy ingredients. Her goal is to help everyone cook delicious food with confidence.