
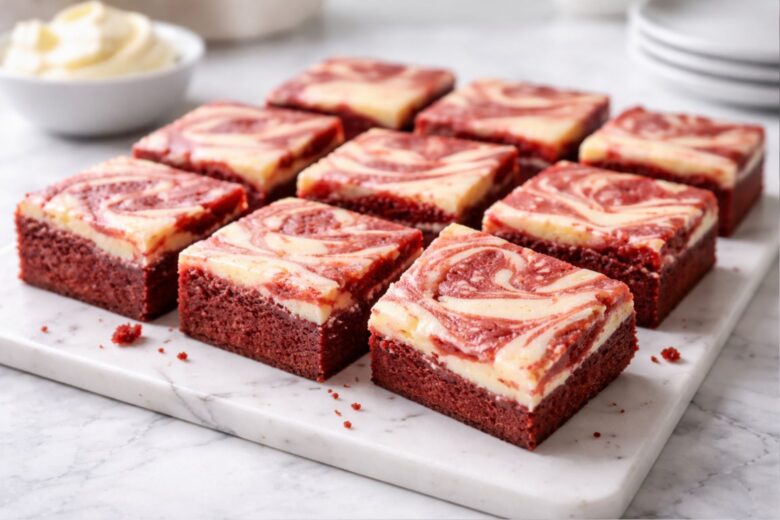
Intro
There are days when I just need something indulgent, something that feels like a hug in dessert form—and that’s exactly when I turn to my favorite Red Velvet Cheesecake Brownies Recipe. As a home chef who spends a lot of time experimenting in the kitchen, I can tell you this recipe is one of those magical combinations that never fails. It brings together the deep cocoa flavor of red velvet with the creamy richness of cheesecake in the most beautiful, swirled way.
I still remember the first time I made these. It was one of those quiet evenings, and I wanted something special but comforting. I didn’t want a plain brownie, and I didn’t want a full cheesecake either. So I thought—why not both? And honestly, that was one of the best kitchen decisions I’ve ever made.
These brownies are soft, slightly fudgy, and have that signature red velvet flavor—mild chocolate with a subtle tang. Then comes the cheesecake layer, creamy and smooth, balancing everything perfectly. Every bite feels like a little celebration.
If you love desserts that look impressive but are surprisingly easy to make, this one is for you. Let me walk you through it, step by step, just like I would if you were standing next to me in my kitchen.
What is the Red Velvet Cheesecake Brownies Recipe?
Let me break it down in the simplest way.
This recipe is a layered dessert made of two beautiful components:
- A rich, soft red velvet brownie base
- A creamy, slightly tangy cheesecake swirl on top
The magic happens when these two layers are gently swirled together before baking. The result? A stunning marbled effect that looks like you spent hours on it (but really, you didn’t).
Red velvet itself is not just “chocolate with red color.” It has a unique flavor—light cocoa with a slight tang, usually from ingredients like buttermilk or vinegar. When you combine that with a sweet cream cheese mixture, it creates a perfect balance of flavors.
What I love most about this recipe is how versatile it is:
- It’s fancy enough for guests
- Simple enough for a weekend treat
- Pretty enough for celebrations
And trust me, once you try this Red Velvet Cheesecake Brownies Recipe, it’s going to become a regular in your kitchen too.
Equipment List
Before we start, let’s make sure you have everything ready. I always say—good preparation makes cooking feel effortless.
Here’s what you’ll need:
- 8×8-inch baking pan
- Mixing bowls (at least 2)
- Hand whisk or electric mixer
- Spatula
- Measuring cups and spoons
- Parchment paper
- Butter knife or skewer (for swirling)
That’s it—nothing fancy. I love recipes that don’t require complicated tools.
Ingredients (with quantities)
Let’s talk ingredients. I’ll list everything clearly, and I’ll also share a few personal tips along the way.
For the Red Velvet Brownie Layer:
- 1 cup all-purpose flour
- 2 tablespoons cocoa powder
- 1/4 teaspoon salt
- 1/2 cup unsalted butter (melted)
- 1 cup sugar
- 2 large eggs
- 1 teaspoon vanilla extract
- 1 teaspoon white vinegar
- 1 tablespoon red food coloring
For the Cheesecake Layer:
- 200g cream cheese (softened)
- 1/3 cup sugar
- 1 egg
- 1/2 teaspoon vanilla extract
Ingredient Tips from My Kitchen:
- Cream cheese: Always use it at room temperature. Cold cream cheese gives lumps, and we want that smooth, silky texture.
- Food coloring: Gel-based works best if you want a deep red color.
- Butter: Melt it but don’t overheat—it should be warm, not hot.
- Cocoa powder: Just a little is enough for that signature red velvet taste.
Instructions
Alright, now the fun part—let’s make these beauties together.
Step 1: Prepare Your Pan
Preheat your oven to 180°C (350°F).
Line your baking pan with parchment paper, leaving a bit of overhang so you can lift the brownies out easily later.
I always do this—it saves so much effort when cutting perfect squares.
Step 2: Make the Brownie Batter
In a bowl, whisk together:
- Flour
- Cocoa powder
- Salt
In another bowl, mix:
- Melted butter
- Sugar
Whisk until smooth and slightly glossy. Then add:
- Eggs (one at a time)
- Vanilla extract
- Vinegar
Now stir in the red food coloring. This is where the batter transforms into that beautiful deep red—it’s always my favorite moment.
Gradually fold in the dry ingredients. Don’t overmix—just combine until smooth.
Step 3: Prepare the Cheesecake Layer
In a separate bowl, beat:
- Cream cheese
- Sugar
Mix until creamy and lump-free.
Add:
- Egg
- Vanilla extract
Whisk until smooth. The texture should be silky and pourable.
Step 4: Assemble the Layers
Pour about 3/4 of the red velvet batter into the prepared pan and spread it evenly.
Now gently pour the cheesecake mixture on top.
Drop small spoonfuls of the remaining red velvet batter over the cheesecake layer.
Step 5: Create the Swirl
Take a knife or skewer and gently swirl the layers together.
Don’t overdo it—you want those beautiful red and white patterns to stay visible.
This step always feels like painting. No two batches ever look the same, and that’s the charm.
Step 6: Bake
Bake for 30–35 minutes, or until the center is just set.
The edges should look slightly firm, but the center can still be a bit soft—that’s what keeps the brownies fudgy.
Step 7: Cool Completely
This is the hardest part—waiting.
Let the brownies cool completely in the pan. Then refrigerate for at least 1–2 hours before cutting.
I know it’s tempting to cut them early (I’ve done it many times), but chilling makes a huge difference in texture.
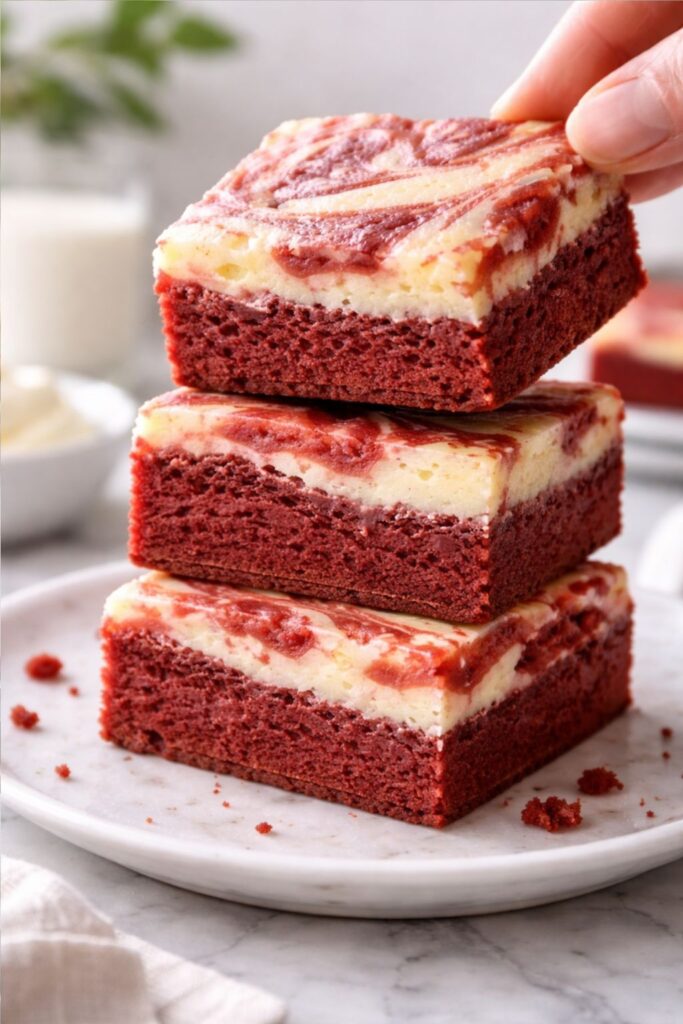
Flavor, Texture & What to Expect
Let me describe what you’re about to taste.
The brownie layer is:
- Soft and slightly dense
- Mildly chocolatey
- Just sweet enough
The cheesecake layer is:
- Creamy and smooth
- Slightly tangy
- Perfectly balanced
Together, they create this melt-in-your-mouth experience that’s honestly hard to stop eating.
The edges are slightly chewy, the center is soft, and the swirl adds both beauty and flavor contrast.
My Personal Tips for Perfect Results
After making this recipe many times, here are a few things I’ve learned:
- Don’t overbake. Slightly underbaked brownies are always better.
- Use room temperature ingredients for smooth mixing.
- Chill before cutting for clean slices.
- Use a warm knife to get neat squares.
Serving Ideas
I love serving these brownies in simple ways:
- With a cup of hot coffee or tea
- Slightly chilled for a firmer texture
- With a scoop of vanilla ice cream for extra indulgence
Sometimes I dust a little powdered sugar on top when I want to make them look extra pretty.
Storage Tips
If you have leftovers (which is rare in my kitchen):
- Store in an airtight container in the fridge for up to 4 days
- You can freeze them for up to 2 months
- Just thaw in the fridge before serving
Why You’ll Love This Recipe
This Red Velvet Cheesecake Brownies Recipe is one of those desserts that feels special but is actually very doable.
You’ll love it because:
- It looks beautiful without much effort
- The flavors are perfectly balanced
- It’s great for any occasion
- It’s beginner-friendly
And most importantly, it tastes amazing.
Final Thoughts
As a home chef, I always believe that desserts should not just taste good—they should make you feel something. And this one? It brings comfort, joy, and just a little bit of indulgence.
Every time I make this Red Velvet Cheesecake Brownies Recipe, it reminds me why I love baking so much. It’s not just about ingredients—it’s about creating moments.
So go ahead, try it in your kitchen. Take your time, enjoy the process, and don’t worry about perfection. The swirls don’t have to be perfect. The cuts don’t have to be even.
What matters is that first bite—and I promise, it’s worth it.
More Delicious Recipes :
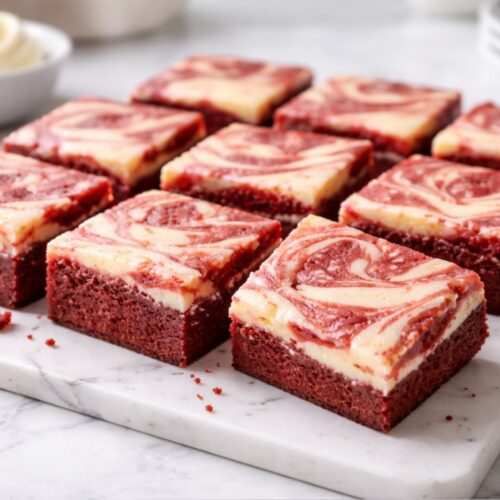
Red Velvet Cheese Cake Brownies Recipe
Equipment
- 8×8 inch baking pan
- Mixing bowls (at least 2)
- Hand whisk or electric mixer
- Spatula
- Measuring cups and spoons
- Parchment paper
- Butter knife or skewer (for swirling)
Ingredients
For the Red Velvet Brownie Layer:
- 1 cup all-purpose flour
- 2 tablespoons cocoa powder
- 1/4 teaspoon salt
- 1/2 cup unsalted butter melted
- 1 cup sugar
- 2 large eggs
- 1 teaspoon vanilla extract
- 1 teaspoon white vinegar
- 1 tablespoon red food coloring
For the Cheesecake Layer:
- 200 g cream cheese softened
- 1/3 cup sugar
- 1 egg
- 1/2 teaspoon vanilla extract
Ingredient Tips from My Kitchen:
- Cream cheese: Always use it at room temperature. Cold cream cheese gives lumps and we want that smooth, silky texture.
- Food coloring: Gel-based works best if you want a deep red color.
- Butter: Melt it but don’t overheat—it should be warm, not hot.
- Cocoa powder: Just a little is enough for that signature red velvet taste.
Instructions
Step 1: Prepare Your Pan
- Preheat your oven to 180°C (350°F).
- Line your baking pan with parchment paper, leaving a bit of overhang so you can lift the brownies out easily later.
- I always do this—it saves so much effort when cutting perfect squares.
Step 2: Make the Brownie Batter
- In a bowl, whisk together:
- Flour
- Cocoa powder
- Salt
- In another bowl, mix:
- Melted butter
- Sugar
- Whisk until smooth and slightly glossy. Then add:
- Eggs (one at a time)
- Vanilla extract
- Vinegar
- Now stir in the red food coloring. This is where the batter transforms into that beautiful deep red—it’s always my favorite moment.
- Gradually fold in the dry ingredients. Don’t overmix—just combine until smooth.
Step 3: Prepare the Cheesecake Layer
- In a separate bowl, beat:
- Cream cheese
- Sugar
- Mix until creamy and lump-free.
- Add:
- Egg
- Vanilla extract
- Whisk until smooth. The texture should be silky and pourable.
Step 4: Assemble the Layers
- Pour about 3/4 of the red velvet batter into the prepared pan and spread it evenly.
- Now gently pour the cheesecake mixture on top.
- Drop small spoonfuls of the remaining red velvet batter over the cheesecake layer.
Step 5: Create the Swirl
- Take a knife or skewer and gently swirl the layers together.
- Don’t overdo it—you want those beautiful red and white patterns to stay visible.
- This step always feels like painting. No two batches ever look the same, and that’s the charm.
Step 6: Bake
- Bake for 30–35 minutes, or until the center is just set.
- The edges should look slightly firm, but the center can still be a bit soft—that’s what keeps the brownies fudgy.
Step 7: Cool Completely
- This is the hardest part—waiting.
- Let the brownies cool completely in the pan. Then refrigerate for at least 1–2 hours before cutting.
- I know it’s tempting to cut them early (I’ve done it many times), but chilling makes a huge difference in texture.
Sarah Miller is a home cook and recipe developer at Foodnesty. She loves creating simple, comforting, and family-friendly recipes using easy ingredients. Her goal is to help everyone cook delicious food with confidence.